 Default Currency
 Australia
 New Zealand
 European Union
 Canadian Dollar
How to choose the right Ski Wax
Check out our selection of waxes here
HOW MUCH WAX DO YOU NEED?
It takes about 12-15 grams to hot wax one pair of alpine skis, or one complete snowboard so 100 gram wax pack is good for about 6-8 hot wax applications.
If you don't hot wax, but rub on the wax (like a crayon) and cork it in, you'll get many more applications, but it will wear off your base faster.
We usually recommend hot-wax applications of universal and hydrocarbon waxes (and low-fluoro waxes if possible) to create a base-layer 'foundation'...and then rubbing fluoro waxes atop these.
WHY WAX YOUR SKIS?
The Quick Answer: A waxed base is about 30% easier to turn, more durable and faster than an unwaxed base, an application of any universal wax will give the average skier a noticeably better ski experience.
The Long Answer: Back in the early days when all skis had wood bases, skiers had little choice but to wax 'em regularly if they wanted to slide on snow. But along with the introduction of polyethylene bases (p-tex) came the assumption that skis no longer needed waxing. Wrong...p-tex is a thirsty plastic that needs frequent wax feedings. In no time at all, the number of skiers who waxed their skis flip-flopped from 97% who did, to 97% who didn't. And that's pretty much where it remains today... amazingly, only 3-4% of skiers or snowboarders bother to wax their equipment. The performance these folks lose because of this misunderstanding is significant.
P-tex bases can easily lose their ability to absorb wax efficiently. The most common cause is simply neglecting to wax regularly. The high friction of snow acts like sandpaper to abrade the base, wear off wax and leave the p-tex dried out. Another cause is too much heat created by a poor stone-grinding, the use of excessive speed or pressure when roto-brushing, or, most commonly, from an improperly used or uncalibrated wax iron. About half the surface area of most sintered racing bases will absorb wax when new...these are call "amorphous" regions. Excess heat converts these to "crystalline" regions, which do not absorb wax. Furthermore, heating the base can increase its oxidation by atmospheric oxygen. Overheating a base also dries it out and results in the creation of more unwanted, drag-inducing p-tex hairs.
You can help thwart most of these occurrences in obvious ways. When hot-waxing, for example, use a decent wax iron that holds a fairly constant temperature (+ or - 8*F). Most household irons don't...they fluctuate wildly in temperature (in excess of 40*F). Be sure to pply enough wax to the base so you have a nice molten layer between the iron and p-tex. Don't let an iron come in direct contact with a dry base. Remember, wax...even the pricey race stuff...is cheap compared to a new pair of skis or snowboard!
HYDROCARBON WAXES
The foundation of most waxes today is paraffin...a hydrocarbon petroleum byproduct that boasts basic hydrophobic (water-repellent) properties. It penetrates deeper into p-tex bases and lasts longest when melted in using a hot wax iron. Less effective but convenient alternatives are to apply a thin layer of bar wax (like a crayon), then vigorously rub it in with a wax cork...or use a liquid or paste
formula (similar in texture to car or shoe polish) that you simply rub on, let dry, and buff off with a clean cloth. The liquid and paste waxes produced these days are quite good!
UNIVERSAL WAXES
For the masses, the most basic and popular formulas are wide-temperature range (universal) waxes. These are versatile, inexpensive, reliable and convenient for recreational riders, patrollers, guides, instructors and others who commonly encounter a wide variety of snow/temperature conditions, and simply need such basic wax benefits as easier turning, decent glide and base durability more than top
speed. These waxes are readily available in bar, paste or liquid form. All major wax companies offer paraffin-based hydrocarbon waxes.
TEMPERATURE-SPECIFIC WAXES
These waxes serve as the foundation for greater performance and racing...and should be the first wax layer you apply, preferably by hot-waxing. They are mixes of high-grade paraffins and other additives that offer greater speed in specific temperature ranges and snow conditions. Depending on your wax brand of choice (we recommend sticking with one initially to simplify matters), you can expect to find from three to five different temperature-range waxes offered by most wax companies, such as:
- Cold wax...for snow temperatures approximately 10*F/-12*C and below. This is a hard wax mix of paraffin and synthetic paraffins...hardening additives that make wax more durable, abrasion-resistant, and immune to scratching by sharp snow crystals (dry friction).
- Midrange wax...for snow temperatures between 10*F/-12*C and 28*F/-2*C. This is a medium wax formulated to counteract the effects of both moderate dry and wet friction.
- Warm wax...for snow temperatures 28*F/-2*C and above. This is a soft wax mix of paraffin and silicone (or similar)...hydrophobic additives that make wax more water-repellent to combat wet friction.
Rotocorking
Technique is critical in rotocorking. There are two general methods. One is to use high rpms and very little pressure. This is what most people do and works pretty well. The cork can skip around a little and it is necessary to go back and forth some which can create lines in the wax.
Another great method is to use very low rpms (don't squeeze the trigger all the way) with high pressure and just one pass from tip to tail. It is easier to keep the cork steady and flat and results in a better finish.
Rotocorking is easier on the base and is also quick. It is far more economical than applying a fluorocarbon by ironing as more is needed when ironing.
FLUOROCARBONS VS. FLAMES...BE ATTENTIVE
Many people associate fluorocarbon waxes with their highly toxic, reactive and ozone-eating cousins...chloro-fluorocarbons (CFC's). But the fluorocarbons used in waxes do not belong in this category...in fact one of their primary characteristics is inertness, or very limited reaction to other materials and compounds. Analysis and tests done on Swix Cera F, for example, showed that when used as recommended, it will not react with human body tissue or fluids.
The melting point of these fluorocarbon waxes is higher than most hydrocarbon waxes, but about the same as hard synthetic paraffin waxes. Use an iron with a surface temperature of no higher than 300 F. (150 C.) to create a temperature in the wax layer of 250 F. (120 C.). Or avoid the use of an iron altogether and cork fluorocarbons directly into the base.
But beware of very high temperatures and open flames with any fluorocarbon waxes. They start to degrade at 570 F. (300 C.), and will decompose at 930 F. (500 C.). During degradation, toxic fumes (so-called Polymer smoke fever) is likely to occur, which can blister and sear the lungs. High temperatures will likewise melt down p-tex base material.
We recommend the following precautions: Do not heat fluorocarbon waxes or powders with an open flame or waxing torch, nor should people be waxing in the same room with open flames. This includes space heaters, cigarette smoking, open fireplace, etc. Do not roll your own cigarettes or anything else if you are working with fluorocarbons, unless you've washed your hands real clean. Wear a respirator and always work in a ventilated room or tent, or even outdoors... waxing in a crowded room is never recommended if you can avoid it, since you never know how careful everyone else is with their waxing. This precaution can be applied to all waxes...hydrocarbon or fluorocarbon... since breathing any smoke is unhealthy
THE COST OF FLUORO WAX
There's no arguing that a bar of fluoro wax costs significantly more than a similar size bar of traditional hydrocarbon wax...after all, the budgets of some national ski teams competing on the World Cup have
jumped from $12,000 to over $30,000 a year! Fortunately, the impact on most of us is a bit less since we don't burn through truckloads of the stuff, plus the amount of fluoro wax actually needed for each
application is less than with hydrocarbon wax. Plus the resulting benefits in speed can sometimes be downright awesome.
HIGH FLUORO CONTRADICTION
It's common knowledge that high fluoro waxes usually work best in high humidity or wet snow conditions...but there can be exceptions to this rule. Snow resorts located in close proximity to the ocean (such as in Alaska, Japan or British Columbia) can sometimes receive snow with an unusually high salt content. This salt can soak up water, leaving the snow surface dry...even in high humidity conditions...which means that low fluoro wax might perform better than high fluoro. Furthermore, salt particles in the snow can make it more abrasive...which means that a harder, cold temperature wax might work better and last longer than a softer warm temperature wax you would otherwise choose based on snow temperature.
SHOULD I USE FLUORO WAX?
How many of you have heard the mythical statement, "Ski bases don't like fluoro!" Well, I'd like to give you a tip...they do! There are many questionable statements and theories out there in the racing communities pertaining to ski and snowboard preparation and this is one of many that I'd like to clarify.
All ski bases need some low fluoro wax in those reservoirs we have come to know as amorphous areas. What are amorphous areas? The answer pertains to race and high performance ski and snowboards manufactured with sintered bases. In sintered p-tex bases, there are complex molecular chains making up the ski base. An analogy to this composition is to think of a grouping of tennis balls in a glass box, all touching one another and these represent the molecules. The empty spaces in between represent the amorphous areas and this is where the wax resides after a good hot waxing.
Now let's get back to the fluoro issue. Except for extreme cold snow, anytime a ski comes in moving contact with snow crystals some form of water will be created. Why? A weighted object (your base) moving against another object (snow) creates friction...and friction creates heat...and this heat transforms some solid snow crystals into a liquid. The more liquid present, the more waterproof (hydrophobic) your bases need to be so these water molecules bead up and roll off. Since fluoro waxes are extremely hydrophobic, your glide speed can increase appreciably (compared to regular hydrocarbon waxes) when more water is present in the snow.
Keeping tabs on snow and air temperature, air humidity, snow crystal types, course preparation, racer speeds and weather forecasts will help you be better choose what fluoro wax to use.
My experience as a World Cup serviceman taught me to always be prepared...limiting my workload and trying to stay a step ahead of the weather. It wasn. t that ski bases disliked fluoro wax, I just wanted to be ready for the next race venue. So when the race was over and if I used high fluoros, my ritual was to immediately get back to my bench, clean out that fluoro wax from all my race skis that day and get them back to a "neutral" traveling state. This way when it was time to use those skis again at the next race venue all I had to do was choose high or low fluoro.
It's quick and easy to remove fluoro from your ski or snowboard, therefore preparing your equipment for your next race prep. Depending on the volume of fluoro wax used in your race mixture, hot scrape and brush 2 to 6 times using TOKO Dibloc low fluoro yellow and System 3 hydrocarbon red; alternating between the two and then travel coat with the System 3 red. Now you're ready for the next race and all you have to do is a race hill inspection, scrape, brush and choose your race wax mixture !
P.S. While at the World Cup Races in Beaver Creek, I visited all the wax "cabins" and submitted my reports to all the servicemen. They were amazed by what I recommended. For the speed events, they were using hydrocarbons on the first day of training. I agreed with them about the cold snow temperatures and low snow surface humidity, leading you to want to use hydrocarbon or low fluoro wax. But I told them about the frozen water present around the snow crystals, and with training runs and race time being 12:30p.m., you need to bump up to high fluoro. Well, by the time race start arrived, the call was for high fluoro wax with speed additives on top! The moral of this anecdote is that you have to consider all the variables that can help you stand on the top step!
-Tom Parks,Former Volkl World Cup Race Technician.
REMOVING FLUORO WAXES
High fluoro waxes stay on your base longer than other waxes. This can cause problems (like increased drag) if snow conditions change from warm/wet to cold/dry. Remove fluoro waxes after racing by hot-scraping bases with a soft (warm temp) hydrocarbon wax, immediately followed by scraping and aggressive brushing.
-Dominator Handbook
SPECIAL USE WAXES
BASE PREP WAXES
New bases, or bases that have just been stoneground, are especially dry, dirty and thirsty. Base prep wax is a soft paraffin wax that, when heated, penetrates deeply into p-tex. It should be applied by hot-waxing numerous times before you head out to the slopes. Heat it in and scrape it off immediately (hot-scraping) several times until no more dirt or discoloration appears in the wax shavings. Then apply at least 2-3 more coats, allowing the base to cool completely before scraping and reapplying again. The base should now be ready for hot-waxing with your hydrocarbon wax choice of the day. Base prep waxes are offered by most major wax companies.
Base prep waxing
Base prep waxing is the essential first step in achieving good glide on your skis or snowboard.
Unlike most glide waxes base prep wax is designed to be extremely soft. This characteristic allows it to penetrate into the deepest recesses of a base where it forms a solid foundation for subsequent wax layers.
Base prep wax also encourages a base to physically “open up” and accept the comparatively harder glide waxes that follow.
It is recommended on new bases, bases that have been freshly structured or bases devoid of wax due to solvent use, that you first “hot scrape” the base to remove any remaining solvent, stone particles or old wax.
To “hot scrape” simply apply the base prep wax and scrape while it is still in the molten state, then brush with a brass or copper brush.
Following the “hot scrape” cycle at least 2-3 applications of base prep wax to assure maximum penetration, some techs cycle even more. A cycle constitutes - applying a layer of wax, allowing it to cool (at least 30min, longer if you can), scraping then brushing with a brass or copper brush.
If you’re looking to save some cash and time, it is also effective to iron a layer into the base, let it cool (30min -1hr), then run the iron over the wax again. This technique helps push the wax into the base and the results are readily apparent as more wax leaves the surface of the ski and sinks into the base with each pass. A couple passes are usually sufficient. Finish by scraping the remaining wax of the surface and brush with a copper or brass brush.
When you have finished cycling the base prep wax it is recommended that you apply a layer of hard(cold) wax over it. Choose a wax that is harder/colder than the hardest wax you intend to use, a blue hydrocarbon wax is often a good choice for this step.
Base prep wax is very soft which is good for penetration but bad for durability, layering a cold wax over the top will help keep it in the base where it belongs. When scraped the hard wax also helps to remove p-tex hairs left over from a structuring process, base prep wax alone is too soft for this job. (The one base prep wax that does not benefit from a layer of hard wax is the Dominator ReNew Zoom wax. This wax contains both ultra-soft and ultra-hard waxes that work together to penetrate and protect.)
When you have completed the steps above, apply your wax(es) of the day in the normal manner.
EXTREME COLD WAXES
Very coarse snow crystals, manmade snow and ice are especially abrasive and strip wax from bases quickly, which can create base “burn”...an oxidizing process that seals p-tex and diminishes its ability to absorb future wax. Extreme cold wax powders are made primarily of hard synthetic paraffins to combat this. It’s sprinkled on bases...or at least along edges where base burn risk is greatest...before dripping your
hydrocarbon wax choice of the day over it. The two are then melted in together. They are offered by most major wax companies.
GRAPHITE & MOLYBDENUM WAXES
Use graphite or molybdenum wax when humidity is low, the snow is fine-grained and temperatures are cold to enhance the static-reducing benefits of graphite bases. It also helps keep bases cleaner in old snow by reducing static "cling" that attracts and picks up contaminates such as dirt, ash, lubricants and pollen, as well as better equalizing heat build-up on bases that can increase suction. Rub on a thin layer of graphite/molybdenum wax (to better distribute the graphite/molybdenum particles in the wax more evenly over the entire base), then drip on
your hydrocarbon wax of the day over it and melt them in together.
Dominator Wax believes graphite wax performs best when rubbed on bases...as opposed to dripping it on with an iron. They say graphite particles in the wax may not be distributed as evenly across the base when dripped on and ironed in...rather, they tend to remain concentrated where the melted wax is first dripped on the base. Rubbing graphite wax on the base with a wax bar distributes graphite particles more evenly over the entire base...and then you can cork or iron it in without a problem.
We asked Dynastar tuner Willi Wiltz about this subject while he was tuning skis for the U.S. Team at Mammoth Mountain. He felt that, in the past, graphite waxes weren't formulated as carefully as they are now, and that he sometimes saw spotty blotches of graphite on the base after dripping and ironing graphite wax on. Nowadays, however, he thinks graphite wax is made better...the particles are more evenly distributed in the wax and a better concentration of graphite is used (too much can reduce glide speed). As a result, Willi didn't think dripping on graphite wax is a problem from what he sees now, but that he uses both application techniques on different occasions.
Swix and Toko basically echoed Willi's sentiments, and added that, with the more expensive fluorinated graphite waxes anyway, many technicians choose to rub (vs. drip) on wax because there is less waste, and therefore greater cost savings this way.
The application of graphite waxes...or rather, the need to apply more graphite wax to a graphite base is another interesting subject. We visited IMS, a company that manufactures p-tex base material in Switzerland. We toured their factory, watched p-tex being made from powdered polyethylene and other ingredients, saw samples of nearly every color and pattern imaginable, and talked at some length with IMS chemical engineer and R&D manager, Urs Geissbuhler. We asked him about the supposed "loss" of graphite that occurs from skiing on electra (graphite) bases. Urs said that, when making this base material, they add a certain percentage of graphite (about 15%...if more is added, it makes base material too brittle) to the recipe. It ends up interspersed fairly evenly throughout the finished p-tex base.
When you ski or snowboard, these graphite particles are, along with polyethylene material, abraded away by the snow...this is the graphite "loss" that technicians often refer to. However, as old material is being abraded away, both new graphite and polyethylene material is also being exposed. Why then have we so often heard that graphite wax needs to be re-applied occasionally to replenish "lost" graphite?
Dominator, Swix and Toko agree, that, although lost graphite is replaced with the exposure of new graphite, there is still a proven and measurable speed advantage from applying graphite wax at regular intervals and/or in specific snow conditions. Graphite in the wax gets distributed over all areas of the base (both graphite and non-graphite regions), thereby enhancing the heat-equalizing and static-reducing benefits of graphite in the p-tex.
Graphite decreases static friction, but, because it is less hydrophobic (waterproof), it has higher capillary friction from absorbing water. Dominator has developed a fluorographite polymer (specially fluorinated graphite particles) to solve this. Electra (sintered graphite) bases absorb about 15% less wax than a similar clear sintered base.
ALPINE vs NORDIC SKI GLIDE WAX
Is there really a difference between glide waxes for alpine vs. nordic skis or snowboards, for that matter? Some wax companies say no...these two disciplines don't vary enough to warrant different glide waxes. Other wax companies disagree, saying that alpine glide wax should be more hydrophobic (water-repellent) due to faster downhill speeds...whereas nordic wax should be more abrasion-resistant to provide greater durability. As a result, they might add a little more hardening additive to their alpine formulas, and call them nordic waxes. As for snowboard wax, they claim it should fall somewhere between these two formulas.
The bottom line? Your P-tex base doesn't know or care if it's on an alpine ski, a nordic ski, or snowboard base...but it does like and need to be waxed frequently. So we recommend that you focus more on waxing your skis regularly (after every day or two of use is best)...and use a wax that's formulated to best match your snow temperatures. The debate over alpine vs. nordic wax is much less important to most of us mere mortal riders (vs. World Cup racers, anyway) compared to these other considerations.
FRICTION
Although friction that occurs between the ski or snowboard base and snow is generally understood as a single entity, it is more accurately described as a sum of 4 components:
1) Dry friction...where dry snow particles touch the base
2) Wet friction...when a lot of free water is present, adheres to the base and creates suction
3) Static electricity friction...electric charged generated on base and edges through movement on the snow
4) Dirt friction...when hard dirt particles penetrate the base and snow simultaneously, connecting them and creating drag
-Dominator Wax
RACE WAX TIP
For super G and downhill events, it's wisest to choose your wax based on the most crucial section of the race course. This usually means a flat section along the course (could be at the top, bottom or anywhere in between) where it's most important to carry and maintain your speed. Don't focus on steeper sections where gravity creates more speed for you. This flat is the place you should go to check snow conditions, temperature, humidity, solar exposure, etc. in order to choose the best race wax of the day. At the world cup level, we try to find a section off the course that's as similar as possible to this one and set up our wax speed testing there, since we're not allowed to speed test on the actual course. If you can nail this crucial section in a race, your chances of landing a spot on the podium can only increase.
-Pete Patterson, Swix Wax Co
KNOW YOUR WAXES
Find out how a wax system works and then stick with that system. Race day is not a good day to test! Knowing what each wax in a system does to affect performance in every kind of snow condition you may face creates confidence. You need to be comfortable with a product line...if you put too many product lines in your box can create confusion.
-Mike "Cookie" Kairys, former Rossignol Serviceman for Picabo Street
COLD SNOW = SLOWER GLIDE
Cold slow is usually dry snow...in fact, somewhere around -20*F (-30*C), snow feels more like beach sand and bases are really slow...whether correctly waxed or not. Warmer temperatures usually create more moisture in the snowpack, which provides greater lubricity and helps the base slide...up to a point, since too much water creates suction that again slows your glide. Ideal glide usually occurs at temperatures just below freezing (28 to 30*F, or -2 to -1*C...depending on the moisture content). Tests conducted by the Ski Research Group at Eagle River Nordic in Wisconsin (using nordic skis gliding downhill through a speed trap on a 12* slope) produced the following results:
Snow Temp Glide Speed % Difference
28*F 18mph --
20*F 17mph 5% slower
10*F 15mph 11% slower
-4*F 12mph 33% slower
-10*F 8mph 56% slower
HOT SCRAPE CLEANING
Hot wax your bases clean using a soft, warm temperature hydrocarbon wax (such as a base prep wax). Then scrape the base while the wax is still molten or warm using a plastic wax scraper. Repeat this procedure until you no longer see any dirt or discoloration in the wax scrapings...this means the base is now clean. To finish this process, let the final wax layer to cool for 30 minutes, then scrape off excess with a plastic scraper. Brush out the base structure and you're ready for the application of your wax of the day. If you suspect oily contaminants in the base, you may need to use some wax remover to initially dissolve the residue...and then recondition the base using the hot scrape technique above.
HOT WAXING
WAX CONSUMPTION
When hotwaxing, it generally takes about 12 grams of wax (1/3 ounce) to wax a pair of alpine skis. It takes a bit less for nordic skis, and a bit more for snowboards. If you're not hotwaxing, but rubbing wax on and corking it in, you'll use less than half this amount of wax.
As an aside...1 ounce is the same as 30 grams of wax.
P-TEX WAX ABSORPTION
For years, most folks in this industry (like us) have told poor unsuspecting blokes (like you) that sintered p-tex has pores or holes in it...and that, when you hot-wax a base, these cavities sorta suck-in and store wax better than regular extruded p-tex bases. Well, we lied...sorry! But we're not totally off-base (pardon the pun), because sintered p-tex does absorb and hold more wax than an extruded base by absorbing it.
Here's what really happens according to Mr. Urs Geissbühler at IMS (a large producer of p-tex) in Switzerland. P-tex is like a super-cooled, fluid-like substance. It's made up mostly of two different types of microscopic regions...tiny little freckles all packed together, if you will. One type is crystalline and the other is amorphous. The crystalline freckles are, as the term implies, hard crystallized regions that don't absorb hardly nothin'. The amorphous freckles are softer, more gel-like, and absorbent. Sintered bases are comprised of about 60% amorphous freckles and 40% crystalline (and a bit less of both of these if graphite particles have been mixed in). Extruded p-tex is just the opposite...60% crystalline and 40% amorphous.
When wax is applied to the base and heated in, it blends into the amorphous freckles... sorta like sugar being mixed into hot coffee. Then, when the base and wax cool again, about half this wax is expelled from the amorphous freckles, like sugar recrystallizing in cold coffee. This is why waxed bases should be allowed to cool thoroughly before scraping and brushing excess wax off.
Incidentally, sintered p-tex is used on about half the skis made today, but on only 10-15% of snowboards (carving boards mostly). Extruded p-tex is used for most snowboards because it costs less, plus has better clarity so base graphics can be seen more clearly.
P-tex is made in different hardnesses, and both are utilized on racing skis. A hard base is usually used in cold conditions because it can better hold up to the greater abrasion of the cold snow crystals. It also absorbs less wax than a softer base, but this is not so important in cold conditions since there usually isn't as much moisture in the snow. Softer bases are preferred for warmer conditions because snow abrasion is usually less, plus the base can absorb more wax...especially important since wax makes p-tex more hydrophobic (waterproof). This reduces the surface tension of water that's usually abundantly present in warmer snow conditions.
Pete Patterson, formerly a downhill racer on the U.S. Ski Team, does wax testing for Swix at the Olympics and World Cup races. To select which skis to use for wax testing, he starts out with about a dozen pair of Salomon skis (usually womens DH models because they're an easier size for Pete to travel with). He waxes them all identically, then skis each pair through the same speed trap. He then selects 5 pair that test at about the same speed (a .1 second variance or so, anyway), and uses these to do Swix's wax testing prior to DH races.
HOT WAX WARNING
According to the folks at Toko race service, the optimum temperature to heat a base is to 130°C (266°F)...this allows maximum wax penetration. But be very careful, because at 140°C (284°F) you can burn a base, effectively sealing it so it will not longer absorb wax. Most domestic irons lack an adequate heating element ...as soon as it touches the p-tex base it starts to cool quickly. This results in part of the ski or snowboard getting good wax penetration and other parts poor penetration. These irons can also jump up well past 140°C (284°F) when trying to reheat... so choose a good wax iron. We have tested all the wax iron models we offer in this catalog to insure safe performance in this regard. To guarantee correct waxing temperature, use a wax iron thermometer (we offer several) to accurately calibrate the temperature of your iron.
CALIBRATING A WAX IRON
Turn on your iron and give it at least 10 minutes to warm up, then check the temperature with a measuring device like our iron temperature platform, coverite thermometer, or any stem-type thermometer that'll read up to at least 300*F. When the heat sensor (thermocouple) in the iron clicks off, the temperature will drop (hopefully not more than 8*-9*C), then climb again (probably a few degrees warmer than last time), when it re-engages. After you see this take place 3 or 4 times, your iron has probably reached the maximum temperature for that particular thermostat setting. You may want to record both this setting and temperature for future reference.
By taking a reading whenever you change your iron setting and keeping a record of the melting temperatures of your favorite waxes, you'll be able to keep the iron at the safest optimal temperature to get the deepest wax absorption while minimizing the possibility of base damage. To be on the safe side, check your iron calibration periodically since the operating temperature will change as the thermocouple ages.
-Sun Valley Ski Tools
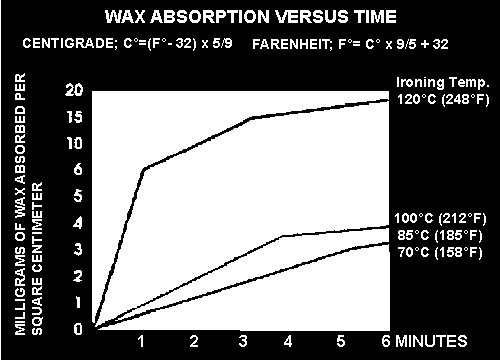
WAX ABSORPTION VERSUS TIME
HOW MUCH HOT-WAXING IS SAFE?
It seems there are as many opinions about how many passes you should make with an iron when hot waxing as there are snowflakes in a storm. Some claim that one slow pass from tip to tail is best, others. ll swear that numerous passes back and forth is much better, still others say to look for a pool of melted wax trailing the iron by 6" to 10". So what is the answer?
Well, there. s really only one rule we always follow when hot waxing...and that is to avoid too much heat. Excessive heat can cause big problems such as:
1) The depth and definition of your base structure can be changed (reduced, or even lost) if p-tex gets too hot.
2) The ability of p-tex to absorb wax can be greatly reduced if exposed to temperatures above 284 degrees F (140 degrees C), plus p-tex tends to become more brittle when subjected to such temperatures.
3) Epoxy and other materials used to make skis and snowboards can soften, warp, or melt...resulting in delamination, structural, and cosmetic damage.
4) Overheated wax creates smoke that is unhealthy, and in some cases, fatal to airbreathing creatures like yourself.
5) Overheated wax can physically break down and not perform as it was designed to.
With the increased use and price of fluorocarbon wax these days, some technicians are foregoing the use of irons more and more...choosing instead to rub on fluoro wax and heat it in with a cork, felt polishing pad (which can generate more heat than a cork), rotobrush, etc. Although the durability of such wax applications is not as good as ironing...such as for a long (50k) nordic race...it is plenty adequate for most alpine, snowboard, and shorter nordic races.
DON'T BURN BASES
Hot irons should never come in contact with unwaxed base material or you can seriously damage it. Drip or rub on enough wax before ironing.
WAX IRON TIPS
For cleanest waxing, hold a piece of fiberlene or base tex paper between your wax iron and base material after dripping or rubbing wax on. It will still heat wax into the base, but remove any dirt present in the wax, base or iron...plus leave a thinner wax layer that won't require as much scraping after the wax cools...which is especially handy when applying hard, cold-temperature range waxes!
Here's the latest Eblast from Toko
We tested the Toko T12 Ski Hot Waxing Iron last week. We wanted to evaluate the consistency of the heat throughout the base, the accuracy of the temperature read out, and the tightness of the thermostat window. We used a PYRO Digital 250 series Digital Pyrometer (contact style) which is basically a fancy thermometer which in our case was accurate to .01 degree. We tested 3 different T12 irons. We tested with the temperatures set to 266F, 300F, and 320F. We took temperature readings toward the front, in the middle, and toward the back at each temperature setting. Spot checking the temperatures was not very practical due to the thermostat window. That said, the temperatures were pretty accurate (within 5 degrees F on average). It also depends on whether the iron is touching the base or a chunk of wax which cools it off compared to if it is just sitting hot without the base touching anything. We were able to establish that the forward part of the iron was hotter than the middle which was hotter than the rear part. This is because the heat element is toward the front. The base plate is thick enough that the heat is distributed pretty evenly, but there was about a 3 degree variance on average. Then we touched the sensor to the middle of the base, held it there, and watched the temperature variance. This was to establish the thermostat window. When an iron is set to a particular temperature, it heats up until it hits that temperature and then turns off. Once it cools to a particular degree, the thermostat kicks the heat element on and it heats up again to a preset temperature and again shuts off. This cycle is repeated again and again. The difference between the lower and higher temperatures is referred to as the thermostat window. One also has to take into account the fact that when an iron is being used, heat is lost through contact with the wax or the ski. If the iron is being tested without being touched to a ski or a block of wax, it will surely be warmer than if it were. We tested the thermostat window by touching the temperature contact sensor of the Digital Pyrometer to it and holding it there. This brought the temperature down (the first cycle was hotter as the base hadn't been touching anything previously). We had the iron set at 300F. The thermostat cycled the iron between 298F and 309F. Had the contact sensor been the ski base or a chunk of wax, the iron would have certainly been a few degrees cooler centering the variance on the desired temperature. So, we were very satisfied with the performance of this iron.12/2008
RETRACTABLE POWER CORDS
If power cords from your wax iron, rotobrush drill or other tools interfere with your tuning work, use bungee cords to get 'em up and out of the way. Thread in a simple eyebolt or hook above your workbench with one end of the bungee cord hooked to it...and the other bungee end hooked on the power cord. Voila...you have a semi-retractable setup. The cord is out of the way...but irons, drills or other tools can still reach all the way to the tip and tail of your gear.
-Jim Brown, Rochester, NY
AVOID TANGLED CORDS
1) Tired of dealing with a tangle of electrical extension cords in your workshop? Try suspending self-coiling extension cords from the ceiling...they' ll always be handy when you need them, and coil up our of the way when you don' t.
2) Do you have trouble keeping the electric cord of your iron out of the way when hot waxing bases? An inexpensive fix is to attach a door closing spring to the ceiling and the cord to the other end of the spring at a point where no slack exists when the iron is on the base. The spring then provides constant tension on the cord as you wax along, keeping the cord out of harm' s way.
-Duke Millington, Forest Lake, MN
DELAMINATION WARNING
When waxing skis or snowboards that have previously been repaired for delaminations, be especially careful not to overheat the base, since it may soften the epoxy you originally used for the repair and subsequently weaken or even it.
- Luke Onesti, email submission
READING YOUR BASES
I’ve used hot waxing to give me feedback on my skiing technique. I apply a very smooth and even layer of hot wax on my ski bases, but don’t scrape off the excess wax. After skiing, I examine my bases to see where the wax has worn off the most. If it’s worn off underfoot and mostly along the tails of my skis, for example, then I’m probably skiing with my weight too far back. Ideally, if you keep your weight correctly centered, the wax should wear equally along both the front and back inside ski edges, and widening underfoot from edge-to-edge.
- Edward Denner, Newburgh, IN
DON'T WAX COLD BASES
Make sure p-tex bases are clean and at room temperature (minimum 60*F) before waxing. If too cold, p-tex base molecules have less space between them to properly absorb wax...which can result in overheating and possibly damaging bases with excessive iron heat.
LONGER LIFE FOR WAX BARS
When your bar of wax is getting short and you don't want to burn your fingers or throw away the last bit of wax, just attach the hot molten end to your next bar of wax. No waste, no burned fingertips. This trick works to lengthen short pieces of p-tex drip candles as well. Also, you can sometimes measure the temperature of your wax iron using a wood or coal stove thermometer if you heat your house with one of these.
-Peter Duspiva, Merrimack, N.H.
GOOD VENTILATION
For good shop ventilation, I installed a through-the-wall ventilation fan about a foot above my workbench. It plugs into a standard 110 volt outlet. It requires no ductwork and can also be installed in a window using a plywood panel and cut-out.
-Don Yep, Alberta, Canada
HOT BOX
Jim Deines of Precision Ski in Frisco, CO recommends rubbing and corking on waxes, then placing them in a hot box (an enclosed box heated with light bulbs and usually used for curing epoxy in skis and boards after doing structural repairs). In many cases, the gentle heat in the hot box melts the wax deeply into the p-tex amorphous regions.
HOT BOX
If resurrecting mashed, delaminated, or exploded skis or snowboards is common in your workshop and you' re continually searching for a safe refuge for clamped and curing boards, a hot box may be just the ticket. It can also help a hot wax sink deeper into your p-tex base. Inexpensive and convenient, it' ll dry them before repair, reduce epoxy drying time, and put an end to random clutter of clamp-festooned weapons lurking about.
The box is made of 1/4" thick plywood and lined with a reflective material. Three regular 100-200 watt lightbulbs (no "soft" bulbs) create a dry climate that varies in temperature from 110-140 degrees F. A full-length hinged door provides easy access, and insulation helps retain the heat. Dimensions can vary depending on the size of boards and skis you repair, but it' s good to leave enough room to hold several at once.
Mount the box on a wall or over a workbench to keep it convenient but out of the way. It's outfitted with shelf brackets to hold boards or skis base or topside up, and slots on the bottom to hold them edge up as well. After hot-waxing, throw a board or skis in the hot box and let wax sink deeper into the base for longer lasting glide. The hot box requires little time or cash to build, and has endless uses from major repairs to keeping pizza warm!
Components
1/4" thick piece of plywood
2"x 2" framing and 2"x 4" slotted bottom rack *picture*
shelf brackets and removable/adjustable shelf
2 hinges and 3 door latches or hooks
foil-backed building insulation or aluminum flashing or foil (commercial grade)
3-4 light bulbs and fixtures junction box with heavy-duty
electrical cord
on/off switch
and pizza rack (optional)
-Chris Doyle, reprinted permission of Transworld Snowboard Business (c)Jan . 94
BETTER WAX PENETRATION
To fully saturate a sintered base (which will absorb up to 20 milligrams of wax per squre centimeter), it is necessary to iron the wax into the base at approximately 248 degrees F. (120 degrees C.) for approximately 3-5 minutes. Sintered bases that are not constantly saturated with wax will oxidize. Once oxidized, the sintered base loses almost all of its ability to absorb wax. To restore an oxidized sintered base, the surface layer of the base must be shaved or ground off to expose fresh un-oxidized sintered polyethylene. Use a Base Flattener to shave off old sintered p-tex, or you can have the base stone ground at a ski shop.
-Wintek Inc., Pembroke, MA
GRUNGE GUARD
I use painter's tape (1.5" wide craft paper with a sticky edge like a post-it notes) to mask the sidewalls on skis or snowboards before filing or hot-waxing. Attach it down the full length of ski or board along the sidewall just beneath the steel side edge (so you can still file or deburr that). When done, just peel it off. Bindings are protected from any filings and wax drips don't need to be scraped off your sidewalls. This tape fits any ski or board and doesn't interfere with ski brakes.
-Chad Ertola, San Francisco, CA
WAX IRON TIPS
If you have no choice but to use your wife's clothing iron when you hot wax, remember:
1) Don't tell her you're doing this
2) Set the iron for the lowest effective but safe waxing temperature
3) Wrap aluminum foil around the iron base to keep wax from going into the steam holes...otherwise your dress shirts will probably have hot-waxed racing stripes next time you get them back!
STEALTH WAXING
Maybe this has been said before, but here's a tip to help keep you outta trouble if you use your wife's favorite iron to wax your bases. After all, waxing is a lot more important than ironing clothes, isn't it? Anyway, after you're done waxing, but before you turn off the iron, set it face down on a pad of old newspapers for 3 or 4 seconds. Lift the iron and repeat this on more newspapers. Then do it one more time. The newspapers soak up the wax off the iron. Now, sneak it back into the closet before your wife wakes up or gets home and you're in the clear!
-Robert Lacy, Lake Oswego, OR
PLUG UP STEAM HOLES
Old irons with steam holes (found at garage sales, etc.) work great for hot waxing bases until wax gets in the steam holes and burns out the heating element. To solve this problem, plug the steam holes with small splitshot lead sinkers found in fishing shops. Find a size that is just a little bigger than the steam holes and press them in. Trim off any excess lead with a file or blade.
Also, I' ve used the plastic rings found on six-packs of beer or soda cans for base repairs. they are polyethylene and can be cut up and melted to fill in gouges.
-Eric Wahlig, Keystone, CO
OLD TOKO RESERVOIR IRONS
Here' s a tip if the little screens in the bottom of your Toko Magic Waxer ever get clogged with old wax...pry the screens out carefully, grab them with some needle-nose pliers, and heat them until they' re red hot with a propane torch or similar. The old wax burns up and disappears like magic. Then, for overkill, I throw them in some wax remover. I press them back into place and it. s back to jiffy waxing.
-Vilis Ozolins, Mammoth, CA
WHAT IS SKI-THRU HOT WAX?
Some resorts in the Swiss Alps feature coin-operated ski-through hot-wax booths on the slopes. You simply insert a few Swiss francs, ski into a covered glass booth, and pause about 60 seconds while the floor under your skis slides open and a wax impregnated brush applies a coat to your bases. Then it wipes off the excess and you slide out the other end and back onto the slopes. Totally mechanized and automatic. Heck of a deal when you're on the fly and your bases are dry!
KEEP YOUR WAX POT CLEAN
If you heat and mix waxes in a pot or reservoir iron, save your refrigerator magnets when they break, and put one in your pot. They'll collect and hold metal particles that otherwise can get in your wax.
-Larry Cohen, Allison Park, PA
HOT AIR WAXING
Instead of using an iron to hot wax, I just rub the base with a bar of wax, then take an ordinary hair dryer, switch it to low power, and hold it about one centimeter above the base. Move the hair dryer along, following close behind with a cork. As you see the wax melt, rub it into the base with the cork...this will ensure a smooth and fast base.
-Pat Perri, Pittsburgh, PA
OTHER APPLICATION TECHNIQUES & TRICKS
X-COLD WAX POWDERS
To achieve greater durability, you can mix in x-cold wax powders (Toko, Holmenkol or Swix) with your preferred wax of the day. This technique proved successful at the US Alpine Nationals held last season at Jackson Hole where Toko tech whiz Will Goldsmith said they melted in a layer of Toko yellow for the snow conditions that day, then sprinkled some x-cold powder in the wet wax 'pool' that usually follows about 6" behind the moving wax iron. They then made another pass with the iron before allowing the bases to cool prior to scraping and brushing as usual. In this way, they enjoyed the full benefit of both the waxes...i.e.-good durability and water-repellency.
MORE "POWDER" TIPS
On abrasive snow, sprinkle some cold wax powder along the base near the edges, then use a scraper to push the powder in a row about 1cm from the edges. Iron it in carefully along the edges, let it cool to room temperature, then scrape and brush as usual.
The wax of the day is applied over this along the full base. For slalom races on icy or abrasive manmade snow, apply cold wax powder across the entire width of the base.
WAXING TIP
Rather than dripping on hot wax or rubbing a cold bar of wax onto ski or snowboard bases, I prefer to lightly heat a face of the wax bar with my waxing iron, then rub it onto bases. I follow up heating this in with the iron or rubbing it with a cork. It uses less wax and requires less scraping afterwards. Just be sure to rub on enough wax so your iron won't contact dry base material.
-Henry Young, Brooklyn, NY